Get the best results out of your interviews with a four-step analysis
Getting valuable insights from your qualitative research is harder than it sounds. If you thought interviews and user tests are easier than ‘hard numerical science’, you’re wrong!
This is not an interview guide. I’m assuming you already did the hard work: you set your research goals, confirmed them with your stakeholders, wrote the interview plan, recruited the right participants and did the interviews / user tests. This is about what happens after.
You’re staring at your notes wondering how the @€£$# are you going to extract meaningful conclusions out of this mess. It’s easy to fall into research traps during your analysis: confirmation bias (seeing what you expected to see), remembering only the first and last participant or forgetting the context of remarks.
Here are the five steps I go through to get usable conclusions:
- Collect useful notes
- Determine pertinence
- Cluster and tag
- Draw conclusions The nice thing is: you can do all of this using free tooling. I suggest Microsoft Word, but Google Docs, Bear and Pages are personal favorites as well.
1. Collecting useful notes #
In machine learning there’s the saying: “garbage in, garbage out”. It means if your starting data (your notes in our case) isn’t good, no AI-magic in the world will deliver you useful outcomes. The same goes for analyzing data by hand.
Writing good notes is hard. It doesn’t come automatically for most people. But preparation helps and you will get better at it over time. I always try to write my interview questions together with the person who’ll take notes and I do the analysis of the conversations with them as well. The best way to learn how to write useful notes is to do the analysis of a conversation.
I talk about a separate note-taker, because I’m a big fan of writing notes during the user test or interview instead of transcribing a recording afterwards. Transcribing video is a lot more work and you’ll miss important context cues. That’s why there are always three people at an interview: the person being interviewed, the experiment leader and the scribe.
Some tips for taking notes: #
- Do not write down everything literally; no one can type that fast. Just write the gist of what was said (and what the participants did) and only write down extremely useful quotes word-by-word
- Record context: write down the answers and the interview questions. Also record actions: did the interviewer help the participant, did the participant pause or hesitate, what happened on screen (in the case of a usability test), is the participant uncomfortable or downright aggressive?
- Write down timeframes. Afterwards you can easily go back to a specific point in time in your recording and get the exact quote
- Add the structure of the conversation: which part of interview where you at when something was said? Use headings in your notes!
- Ask questions as note-taker — “what exactly did you mean with that?”. The most useful questions usually come from the scribe!
- Reflect shortly after each interview: discuss an overall feeling with the experiment leader and write that down
2. Determine Pertinence #
Step 2 in our process is determining pertinence. Not everything in our notes is gold. We want to mark the relevant bits, the things that are pertinent to our situation.
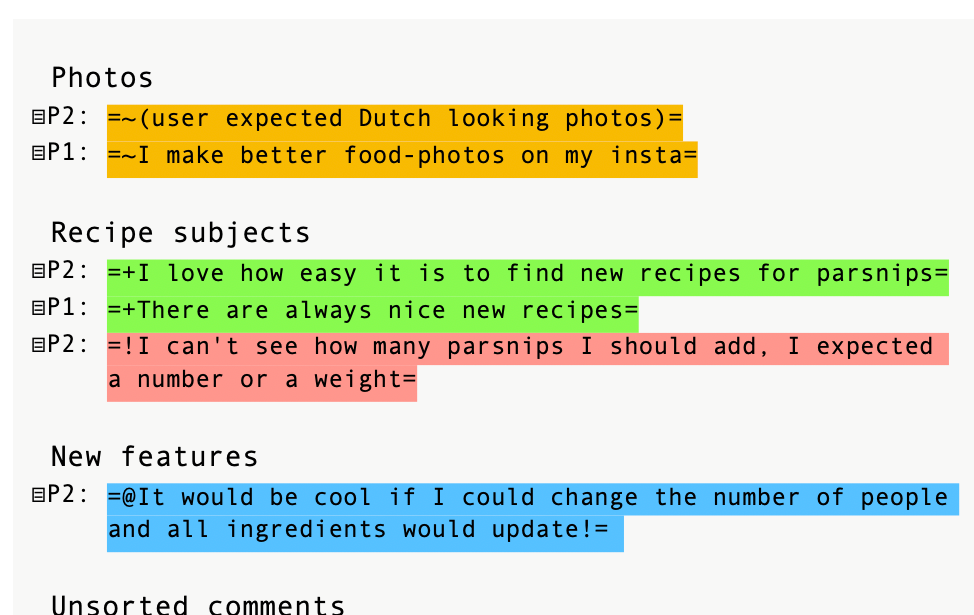
Paste the notes of all participants underneath each other in one file, and use a big header to separate one participant from another. Highlight the (parts of) paragraphs that seem useful, and be gracious: better select too much than too little. I prefer Microsoft Word for this because as soon as you select text the mini-toolbar appears and you can easily highlight your selection.
I use this color scheme:
- green: positive comment / experience
- red: hard failure
- orange: negative
- blue: informative but neutral
- purple: everything else interesting (wishes, random facts, etc) Usually about 30–50% of the text gets colored (tip: experienced note takers can get a lot of pertinence done in ten minutes after an interview). This is also a good moment to remove any privacy-sensitive data you don’t need from your notes.
Now on to the next step!
3. Cluster and tag #
Warning: this step involves manual labor
Copy (not cut!) all pertinent bits to the bottom part of your file on new lines, leaving an empty line in between. Add the name / number of the participant (“P1: ”) before each bit.
This results in a colorful mess: a lot of colored paragraphs with blank spaces in between.
Now we’ll do something called an affinity diagram. Copy a paragraph and paste it together with another paragraph that seems like they belong together. Congratulations: you created a cluster. Keep adding bits to the clusters until no paragraphs are left unclustered. Use double lines to mark off a cluster.
Whenever you feel like it, name your clusters. You can give them tags or headings. Feel free to rename or reshuffle until you feel right about the clusters.
Refuse the urge to do easy grouping (like grouping all the positive things together or grouping based on the interview question), try to look for deeper patterns instead. Make clusters with multiple ‘colors’.
Tip: another nice thing of Microsoft Word is that you can do this stuff together with other researchers with the cloud package.
4. Drawing conclusions #
By now you’ve wrestled with your data so much, you’re probably seeing patterns already.
Write your conclusions down per cluster and support them with quotes / video / audio. Going back to your recordings is important to objectively check if you put your findings in the right context. Tip: if you upload your video to youtube, they can automatically sync existing notes to the video.
When drawing conclusions, be critical:
- How many people actually supported that argument? If you added the participant name or number per bit, that should be easy to see
- Did the participant really mean what you infer? Go back to the recording or the full context of the note. Did the participant say this himself, or was he offered an answer by the interviewer?
- Can you relate the findings to some properties of the participant? (Knowledge level, age, familiarity with subject-area) Maybe you find out the participant is not completely your target audience and this finding has less weight?
- Are participants pleasing you? “Your design looks amazing!” or saying socially desired things? “I sport three times each week and only eat apples”
- Relate to your research questions and other data. What were you expecting to see based on earlier data or assumptions? Anything you didn’t write hypotheses for (or can corroborate with other research) should raise alarm bells: new and unexpected findings are great, but they will need to be confirmed with new research! Also: don’t trust results that you were expecting, don’t fall into the trap of confirmation bias!
I’ve shared my approach to retrieving useful conclusions from qualitative research, but that’s not end of this story! I’m really curious to hear how you do it or if you have any feedback on my methods! Please leave a comment on the article, or PM me on LinkedIn
Good luck with your research! 😇
This article was previously published on Medium: Get the best results out of your interviews with a four-step analysis